My little part of the Internet

Category: VMware / Virtual Box / HyperV

HP Microserver N40 Disk Upgrades ….. more than 4 disks ?

I use a HP Microserver N40 for use at our office.   Its a great peice of kit that I have had for a number of years and is used for a variety of purposes such as NAS, Media Sharing, Print/File Server and Virtual Machine host…
I recently decided to upgrade from Windows Home Server 2011 to Windows Server Essentials 2012 R2, as well as some hardware upgrades.

Sadly i found that Essentials 2012 R2 does not have a driver availible so support for this RAID card is not possible.  One thought was to use the Server 2008 R2 X64 driver but sounds a bad idea to me.   I then decided to look at using Windows Server Storage Spaces which is a technology Microsoft have been working on for a long time.  I had 2 x 4TB WD Green and 2 x 2TB WD Green drives in the 4 way SATA bay.
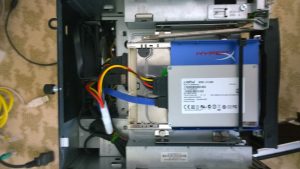
Not wanting to install the OS on the 4TB drives, I decided to make use of a spare SSD.  This was then connected to the motherboard SATA port.
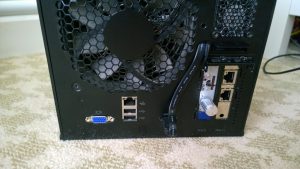
I then realised there is an E-SATA port on the rear of the server.   With a bit of a Heath Robinson hack I managed to get this routed internally and then into a spare hot swap 3.5″ bay I had spare that I installed into the CD Drive 5 1/4″ bay.  The mod was to bend the left edge of the flap that covers the PCI slot screws outwards with a multitool which allows the E-SATA cable to be routed internally.

A quick addition of a SATA power splitter and job done.   Six drives in a four drive server !
I need to make sure recovery will work storage spaced going forward but the Heath Tools in Server Essentials seem to to quite good so time will tell.
Looking good so far….

Virtual Machines and Home Lab’s. Why do the vendors make it so hard ?

I am a big fan of running everything virtually.  There used to be day when I had a ton of kit but now all I have is a small HP Microserver, an i7 Lenovo desktop PC, Lenovo T440S i7 Laptop and an i3 Surface Pro 3. I use VMware Workstation 10 as much as I can.   I used to use Virtual Box back in the day but found it just too troublesome with converting VM’s from manufacturers.
Most of the time it is very easy to download a virtual machine from a manufacturer and it will just run.  Juniper, Microsoft and some others are good.  Some will be in VMware appliance formats.  Others use the open OVA format.  Others such as Cisco, F5 and Fortinet will only support OVA’s that you can only import into ESX.  Workstations fails with various errors even though  – in theory – OVA is an open, portable format  …….
My fix is do this:

1) Download VMware ESX evaluation

2) Install as a VM within VMware Workstation

3) Navigate to the ESX Managment address via a browser.   Either use the Web GUI or vCentre GUI

4) Import the OVA into ESX

5) Once imported.   Navigate to the Data Store Browser.

6) Copy out the whole folder for the imported VM

7) Open the VMX in VMware Workstation.

8) Edit the NIC’s etc as nessiary

9) Start the VM

That seems to always work for me !
 

VMware Workstation 8 – WAN simulation (Awesome feature alert)

Just found an awsome feature…… a bandwidth and interface error generator for each virtual NIC.  Great if you are doing Proof of Concept testing for high latency or even 3G simulated links.
To configure, locate the virtual NIC properties and press ‘Advanced’
VMw-Net1
Then you will be shown this screen.  You can select preset bandwidth in both directions and packet loss
VMw-Net2
Its truly an awsome product that amazes me each time I try to do somthing

Cisco CUCM/Call Manager – Running on Sun’s Virtual Box

Well it is possible 🙂 with a bit of hacking – but thats what its all about, isn’t it !
I actually used an existing working VM that had been built on VMware.  I will test building one from scratch on VirtualBox but not 100% sure it will work….
Anyhooo…
1) Get the existing VMDK and copy it to your Virtual Box machine repository
2) Create a new VM using a Linux, Redhat, 1024MB RAM etc machine and set the disk as the VMDK
3) Modify the machine – I removed the sound card
4) Locate the machines XML config file.   The directory is set in VirtualBox’es config.  Edit it and add the following:

Add the following lines to it in the "<ExtraData> </ExtraData>" section:
<ExtraDataItem name="VBoxInternal/Devices/pcbios/0/Config/DmiBIOSVersion" value="6 "/>
<ExtraDataItem name="VBoxInternal/Devices/pcbios/0/Config/DmiSystemVendor" value="VMware"/>
<ExtraDataItem name="VBoxInternal/Devices/pcbios/0/Config/DmiBIOSVendor" value="Phoenix Technologies LTD"/>
<ExtraDataItem name="VBoxInternal/Devices/pcbios/0/Config/DmiSystemProduct" value="VMware Virtual Platform"/> 

(That bits from http://ubuntuforums.org/showthread.php?t=1029144)
5) Next follow the guide here http://www.blindhog.net/how-to-get-root-access-on-call-manager-56-server/ to get root access.  Make sure you use the CentOS Disk 1 rather than the Live Disk…….grrrrr
6) Edit the /usr/local/bin/base_scripts/hardware_check.sh script to look like this:
We essentially comment out the hardware check and validation 🙂

function check_deployment()
{
    local tmp_deployment
    initProductLibrary
    tmp_deployment="$deployment"
    # Check the deployment
#    isHardwareValidForDeployment $tmp_deployment
#    rc=$?
#   if [ $rc -ne 0 ]; then
#         log info "$tmp_deployment deployment Not Supported"
#         return 1
#    fi
    # Deployment is supported by this hardware
    log info "$tmp_deployment deployment Is Supported"
    return 0
}

 7) Save it and reboot
8) The VM should come up and work !

Sun Virtual Box – Cloning machines

I’m a big fan of Sun’s Virtual Box – its cross platform (I run it on Windows 7 X64,OS X and Ubuntu), FREE and works 🙂
Cloning machines is pretty the same as all OS’s, with one slight twist…..
1) Copy the VDI file you want to clone/backup.
2) This file won’t boot because it has the same UUID as the first file you copied, so need to use VBoxManage utility to give it a new random UUID.
3) Open command prompt, and change to your Vbox directory with VBoxMange.exe in it. Probably located at C:Program FilesSunxVM VirtualBox
4) Run this command in command prompt
VBoxManage internalcommands setvdiuuid “D:My Virtual MachinesVDIHardDiskName.vdi”
Obviously you would change the above path to point to your NEW VDI file that you created (not the original).

Quick and dirty Virtual Machine re-sid’ing

For a test environment its handy to have pre-build OS’s (especially on Windows) to run a new one up quickly.  For those who dont need support or havnt got the time to spend getting Sysprep to work properly try this script below in conjuction with the SysInternals NEWSID application.

  1. Copy NewSID.exe to c:
  2. Copy the script source below to c:NewSid.cmdstart /wait c:newsid.exe
    del “c:documents and settingsall usersstart menuprogramsstartupnewsid.lnk” /q
    del c:newsid.exe /q
    shutdown /r /t 10 /f /c “SID Change” /d 2:4 /m \HOSTSERVERNAME
    Note: Change the \HOSTSERVERNAME to reflect the servers current hostname
  3. Add a shortcut to c:documents and settingsall usersstart menuprogramsstartup called NewSID that links to c:newsid.cmd
  4. Clear the eventlogs etc and shutdown
  5. Clone the disks

When the machine first boots and you logon, NewSID will run and ask you if you want a new machine name etc.  Dont reboot at the end otherwise the util will keep running
I know its nasty but its quick. dorty and works 🙂

© 2024 Kevsters Blog

Theme by Anders NorénUp ↑